
The time has long passed when the presence of protective grounding was the prerogative of exclusively industrial enterprises. With the increase in the number of household appliances in our homes, protective grounding has become an indispensable attribute of any private home. And this is not surprising. Any violation in the insulation of electrical appliances can lead to very serious consequences for the inhabitants of the house.
The best way to protect yourself is to equip yourself with grounding. There is no need to involve professionals in installing the grounding loop at home. Anyone can cope with this task. The main thing is patience and attentiveness while working.
Purpose and design of the ground loop
Protective grounding is a connection between live parts of electrical installations and the ground, made intentionally.
During normal operation of electrical appliances, their housing is not energized. It is safe to work with such devices. Unfortunately, the more devices there are, the higher the likelihood of any of them failing. The slightest damage to the insulating layer – and the body of the device will be energized. Touching such a device is deadly.
It is precisely these situations that protective grounding prevents. Everyone knows that electric current flows in the direction with the least resistance. The presence of a ground loop in a private house with a low resistance value is a guarantee that the current will flow into the ground.
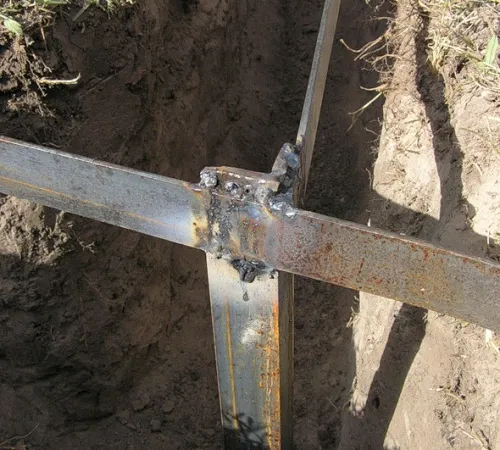
The most common type of ground loop consists of electrodes buried in the ground. They are connected in the form of a closed loop of a certain shape. A triangular contour shape is often used. It is possible to make a ground loop along the perimeter of the building. Among the main criteria for choosing the shape of the circuit are the convenience of its installation and the size of the territory used for its construction. The grounding loop is connected to the electrical panel using a special grounding cable.
The optimal distance between the house and the ground loop is considered to be 5 m. At the same time, a distance closer than 1 m and further than 10 m is considered unacceptable.
Advice: the minimum depth of the grounding loop is 0.8 m. A loop located within the boundaries of soil freezing does not work in winter.
The electrodes are buried 1.5 – 3 m into the soil. The choice of depth for each case depends on the structure of the soil and its moisture content. The more saturated the soil is with water, the less the electrodes are buried.
Materials required for installation of the ground loop
As a rule, the ground loop is made from scrap materials. Any rod made of ferrous metal can serve as a grounding electrode. The choice is very wide. The main criterion is the ease of driving into the ground. Steel angles are mainly used. It is possible to use smooth structure fittings, pipes, and I-beams. The only requirement is a metal cross-section of 1.5 cm 2.
To determine the number of required electrodes, calculations are used extremely rarely. Mostly they use the experimental method. The most common number of electrodes is three. Thus, a triangular-shaped ground loop is obtained. The vertices of the triangle are the electrodes. A distance between adjacent electrodes of less than 1.2 m is unacceptable. It is calculated based on soil resistance. The electrodes are connected using metal strips. A similar strip also serves to connect the circuit to the distribution circuit.
Before installing a ground loop, be sure to consult a qualified electrician in the area. Such a specialist knows from experience how to make a grounding loop that is ideal for a given area:
- what should be the distance from the building to the contour;
- what should be the distance between adjacent electrodes;
- number of required electrodes;
- the depth to which the electrodes should be driven;
- the depth at which the outline should be placed.
The undeniable advantage of a homemade grounding system is its low price.
It is not necessary to make a ground loop only from scrap materials. Special ready-made grounding systems have appeared on sale.
A set of modular grounding systems consists of the following:
- rods made of high-quality steel and coated with copper. The length of the rods is about 1.5 m, the diameter is 0.14 m. Each rod is equipped with a copper-plated thread;
- brass couplings for connecting ground loop elements;
- tips. Helps facilitate driving the rod into the ground. Attached to the rod using threads. There are several types of tips. Designed for various types of soil;
- clamps for connecting horizontal elements to vertical ones;
- anti-corrosion paste for treating all elements of the grounding system.
Grounding calculation
Whatever option of the grounding system is chosen, a mandatory step is preliminary calculations of grounding parameters. Grounding is usually done experimentally. This method will help you avoid many complex calculations.
The algorithm for installing the ground loop in this case is as follows:
- We build a triangular grounding loop at a distance of 5 m from the house. We take the length of the electrodes to be 3 m, and the distance between them is 2 m. We use metal rods.
- We connect the electrodes.
- We measure the resistance of the ground loop. To measure resistance we use a special device – an ohmmeter. The maximum permissible ground loop resistance is 10 ohms. The optimal value is 4 ohms. We compare the obtained result with the optimal value.
How to make a ground loop with your own hands
After carrying out all the preliminary calculations and preparing the necessary materials, we proceed directly to the installation of the ground loop.
Tip: the best time to install a ground loop is summer. And not only because it is easier to carry out excavation work in the warm season. The fact is that in dry soil the resistance is greater. Having achieved the optimal resistance value in dry weather, you should not worry about the deterioration of this indicator in the future. On the contrary, with increasing soil moisture the resistance will decrease.