Constantly using a 220-volt household power supply, we do not think about the dangers of high voltage. Long-term trouble-free operation of electrical installations dulls the sense of self-preservation.
Only in the event of an electric shock or fire due to faulty electrical wiring, the search for the cause of the trouble begins.
In the vast majority of cases, home grounding will correct the situation. The “earth” will not save you from an electrical wiring fire, although this is possible if the switching devices are properly connected. But saving your health, or even life, is a feasible task.
Is it necessary to do grounding in a private house?
If you answer the question in one word: absolutely – Yes! To understand the process, consider the principle of operation of the “earth”.
Soil, regardless of its origin, is a good conductor of electric current. Different materials resist electricity differently, and soil moisture plays a big role. But in any case, there is always a potential difference between the phase wire and the ground (in the literal sense of the word).
Many electrical appliances in your home have a metal body.
PC system unit, refrigerator, electric oven, water boiler, iron, and many other devices. A common breakdown of household appliances is the so-called penetration of electric current into the body. In other words, the external panels of the device become a phase contact.
If you touch a body that has voltage, an electrical current will flow through you to the physical ground. Depending on the humidity, your shoes and floor covering, the current strength will be different. But the danger of electric shock is very high. It is enough to touch a water tap or a heating radiator, and an electric shock can be fatal.

If there is grounding in a private house, and your electrical appliances are connected to it, electric current will flow through the grounding wire.
Why? Now you will understand. Ohm's law states that current is directly proportional to voltage and inversely proportional to conductor resistance. The body of the electrical appliance is grounded. The conductor resistance is 2-5 Ohms.
Your body's resistance is measured in kiloohms, which is thousands of times greater. Even if you are standing barefoot on a wet concrete floor, there will be little, if any, electrical current flowing through your body.
Important! All of the above is true only for electrical appliances that are correctly connected to the ground loop.
Let's assume that the supply wire is frayed and touches the exposed core of the metal body.
Sparking and overheating may occur, resulting in a fire. Or the circuit inside the electrical appliance will fail.
If the device body is normally connected to the ground wire, a short circuit will occur. At the same moment, the machine at the entrance to the house will open the electrical circuit, and the danger will be removed.
Grounding a private home is necessary not only to ensure safety.
All modern electrical equipment is a powerful generator of radio waves and read – interference. Noise during a telephone conversation, ripples on the TV screen, decreased WiFi Internet speed, and crackling in the speakers when listening to music.
All this is the result of uncontrolled filling of your home with electric fields. They are also, to put it mildly, unhealthy.
You probably noticed that the power plug of a computer monitor, TV or music centre has a third terminal - for connecting the ground.
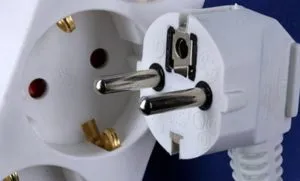
It would seem, why? After all, they have plastic cases, electric shock is excluded.
Important! The efficiency of grounding (in terms of safety) can be increased if residual current devices (RCDs) are installed on the input circuits. The machines react to current leakage and instantly de-energize the dangerous area.
We figured out the need to organize grounding in the house. Now let's talk about its presence in an already built home. If you are just designing a country house, the electrical wiring will comply with the standards of PUE, SNiP and GOST.
What if you purchased a ready-made home that was not equipped with “land”, or your house was built at a time when the rules and regulations were not taken so seriously? Then you will have to lay the grounding loop in the house with your own hands.
How to properly do grounding if your house has already been built and the site has been laid out?
To begin with, let's define the terms:
Grounding conductor.
This is a wire or metal bus that connects an electrical appliance to a grounding electrode.
Attention! This conductor should not be used as a grounding conductor! It is subject to completely different requirements - maximum conductivity and high-quality contact.
"Earth" - A slang term describing any element of a grounding structure. From the contact in the power plug to the metal rod buried in the ground.
A grounding electrode is a structure made of corrosion-resistant conductive material (metal) and has direct contact with the ground. To ensure minimal resistance to current flow, the ground electrode should be immersed in the ground 0.5 meters below the typical soil freezing level in a given region.
In regions with a predominantly hot climate, the critical level of depth is determined by the layer of soil that dries out in summer. In general, the ground loop in a private house should always be on damp ground, these are the electrical safety requirements.
Grounding electrodes can be artificial or natural. We will return to the creation of artificial grounding systems later, but now we will look at how to make grounding in a private house using ready-made structures.
Do-it-yourself grounding device in a private house without constructing a circuit
PUEs allow the use of ready-made architectural elements, communication networks, supports and other structures as grounding. The only condition is compliance with the level of resistance to the current flow. For 220 volts AC voltage, the value should not be higher than 4 ohms.
For example, a steel pipeline running in the ground. This is a fairly massive structure that can provide reliable grounding for the house. Or metal supports for a wooden pole. In old neighbourhoods, rails were usually used, buried 1-1.5 meters into the ground.
Excellent ready-made grounding device. Power cables are often lead-lined. This metal is practically not subject to corrosion. If the cable has a sufficient depth, the circuit will be of high quality. Piles with a shell made of steel pipes are also a good option for organizing electrical protection.
Attention! Such a grounding arrangement is considered safe only after measurements of the spreading current, or another method of verification.

How to check grounding without using special instruments?
Using available means, you can test the natural grounding conductor with sufficient confidence.
- Using an electric lamp. It is enough to take an incandescent lamp with a power of 40-60 W, screwed into the socket. Connect a flexible wire with insulated probes at the ends to the lamp. One wire is connected to the phase contact of a working 220-volt input. The other end alternately touches the neutral contact and the grounding conductor. If a change in the brightness of the lamp is not noticeable to the eye, the natural grounding resistance is quite low;
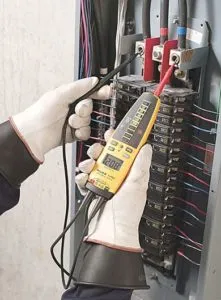
- A more accurate method is with. The mode switch is set to the “alternating voltage measurement” position. The accuracy limit is as close as possible to 220 volts. In most cases this is 500 volts.
We measure the voltage between phase and zero. Then we connect to the phase-ground pair. The value on the scale should be as uniform as possible.
If the listed methods have shown insufficient effectiveness of natural grounding, look for another connection point. Briefly pouring water on the pole, or trying to connect to the other end of the water supply will not change anything.
It actually has an electrical connection with the ground. But the grounding loop is located at the nearest transformer substation. On the way to your home, the “zero” may burn out, be torn off, or simply gain high resistance due to the distance.
How to make a full-fledged grounding loop in the house?
No matter how tightly your site is laid out, you can always find a place on it to install a ground loop. Moreover, the ground electrodes will be located deep in the ground and will not cause damage to green spaces.
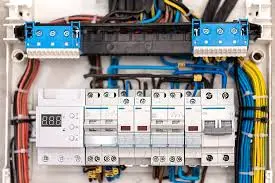
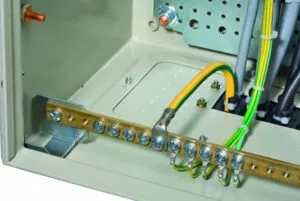
The grounding connection diagram in a private house begins with the distribution bus. From it there is wiring to each consumer. This can be the third contact in the socket or a separate wire that has a connection to the corresponding contact of the body of the electrical appliance. It would be optimal to place the grounding bus in the common electrical panel.
Each conductor must have its own contact; placing terminals on top of each other is unacceptable. An oxidized layer may form between them, and the resistance will increase sharply. Then all subsequent consumers will not have reliable grounding.
Next, the grounding conductor is led outside the house. It is desirable that it be continuous all the way to the ground electrode. Any mechanical connection increases the resistance of the circuit. The wire used has a cross-section of at least 6 squares.
The ground electrode should not be single. The circuit is made of at least three elements connected to each other by welding.